Diagnose and troubleshoot of Keyboard
and Mouse Not Working in Windows
Method 1 – Try PS2 Ports
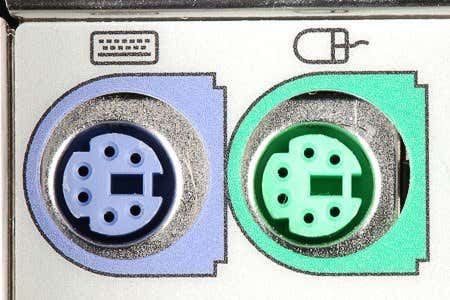
The first article I read when searching for this problem mentioned attaching a PS2 keyboard and mouse and then getting access. I had already thought of that, but my computer is newer and therefore only has USB ports! If you’re lucky enough to still have PS2 ports, then you just need to find an older keyboard and mouse to use to gain back access. If you’re like me and only have USB ports, then read on!
Method 2 – Check the BIOS
The next step is to check the BIOS and see if somehow USB was disabled. You can pretty much be sure it’s not disabled if you can still use your USB device while in the pre-boot environment. If it only dies when Windows starts to load, then it’s probably enabled.

Be very careful not to change the settings to USB Disabled! If you do that, then you won’t even be able to use your USB keyboard while in the BIOS and you’ll really be in trouble. The only way to enable a USB keyboard after your disabled USB in the BIOS is to either use a PS2 mouse or remove the CMOS battery off the motherboard! Unless you want to be taking apart your computer, definitely don’t disable USB if you don’t have any PS2 ports. If USB is enabled, which it probably will be, then move on to the next method.
Method 3 – System Restore
This method is the one that finally worked for me. I was really lucky because I had just installed a program the day before and Windows created a restore point for me automatically. Hopefully, you didn’t disable system restore on your system because if you did, you’re going to have to take more drastic measures to get your keyboard and mouse working again.
To do this, you need to press the F8 key right when Windows is about to load. Once you see the logo for the computer manufacturer, you should start holding down F8. If you have a dual boot system or a multi-disk system where you have to choose which drive you want to boot from, go ahead and select that OS or disk from the list and the instant after you press Enter, press and hold the F8 key. That should get you into the Windows 7 Advanced Boot Options dialog.
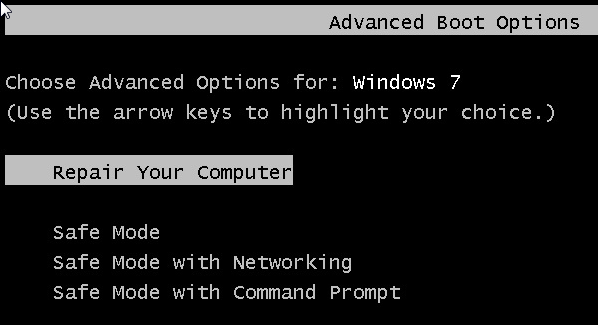
You’re going to go ahead and choose Repair Your Computer. I tried logging into Safe Mode also, but the keyboard and mouse still refused to work, so that was a dead end. Now you’ll see a list of system recovery options.
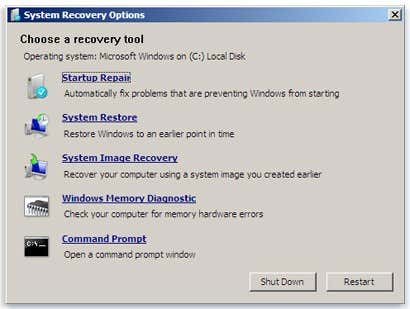
Click on System Restore and you’ll get the familiar dialog box where you can select a restore point. You obviously want to pick one that was created before your problem occurred. By default, it will pick one for you, but you can choose a different one if you like.
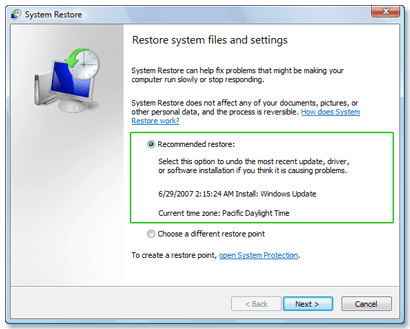
Once you restore, you should be good to go and have access to your keyboard and mouse again. If you didn’t have a restore point created, then you are pretty much out of luck. Unfortunately, at this point, I haven’t been able to find any other guaranteed solutions outside of PS2 ports and system restore. There are some last resort hail-mary options I’ve listed below.
Method 4 – CMOS Battery
This probably won’t help because the problem is related to Windows, but you can give it a shot. Thankfully removing the CMOS chip is not all that bad. You just have to open your case and find the little round battery on the motherboard, which is usually easily visible.

Method 5 – Repair Install Windows 7
If you don’t have a restore point, then the last resort option is to perform a repair install. This will replace the mouse and keyboard drivers with the original ones and you should be working again. A repair install will simply re-install the Windows OS, but will not delete your data.
The process is fairly long and it will take some time, but it’s better than having to re-install Windows altogether. SevenForums has an awesome tutorial that walks you through the whole process and explains all the caveats, etc.
No comments:
Post a Comment